

You’re looking for a simple, code-free way to build high-converting landing pages, right?
In the past, creating a landing page required endless back and forth with designers and developers.
Now, it’s something that you can do from the peace and quiet of your own computer (no meetings required!).
But to realize that dream, you’re going to need a landing page creator.
Leadpages is one such tool. And in my Leadpages review, I’ll dig into whether or not it’s the right tool for you and give you a real look at how Leadpages functions.
Overall, I’m impressed by the ease of use and functionality that Leadpages offers. But let’s not jump too far ahead!
What does Leadpages do? A quick look at the feature list
I’m definitely going to go more in-depth with these features later on. But because Leadpages includes a few separate, but connected features, I thought it would be helpful to do a quick dive into the features before I actually go hands-on and show you around the Leadpages interface.
Obviously, the core of Leadpages is its landing page creator. This creator offers:
- Drag and drop editing – In 2016, Leadpages completely redesigned its editor to offer drag and drop and the new experience is intuitive and glitch-free.
- 130+ free templates + a huge marketplace of paid templates – These help you quickly spin up new landing pages because all you need to do is edit the text and hit Publish.
- Tons of marketing integrations – Easily connect to your favorite email marketing service, webinar tool, CRM, payment gateway, and more.
- Hosted landing pages – Leadpages hosts all of your landing pages for you, though you can still use your own domain name.
- Tons of website integrations – Leadpages also makes it easy to hook up to your website. For example, there’s a dedicated Leadpages WordPress plugin, as well as tons of other website integrations for Squarespace, Joomla, and more.
- Easy A/B testing – You can quickly spin up a new split test to see which versions of your landing pages perform the best.
- Detailed analytics – Not only does Leadpages provide in-dashboard analytics, but it also makes it easy to get up and running with Facebook Pixel, Google Analytics, and more.
So that’s the landing page builder part of Leadpages…but it also includes a few other “lead” branded features. These are:
- Leadboxes – Custom designed pop-up forms that you can display automatically or based on a user’s actions. You can even link a button that you create in the landing page creator to a Leadbox to easily create a conversion-boosting two-step opt-in.
- Leadlinks – These allow you to sign up existing subscribers to an offer in one click. For example, you can sign them up for a webinar or a sublist just by sending them a link.
- Leaddigits – This one is a bit more niche – but it enables your leads to opt in to your email list or webinar via their mobile phones and automated text messages.
While the landing page creator is still the core value, these smaller additions can help you do some neat things and also integrate well into the landing page builder.
Note: Leadpages have added an entire website builder feature so you can create entire conversion-focused websites as well. We’ll cover this feature later in the review.
How to create a landing page with Leadpages
Now that you know what to expect on a theoretical level, let’s make this Leadpages review a little bit more…hands-on.
That is, I’ll actually take you through the interface, give you my thoughts, and tell you how you can apply Leadpages’ features to your own business needs.
To spin up a new landing page, all you need to do is click a button in the Leadpages interface:
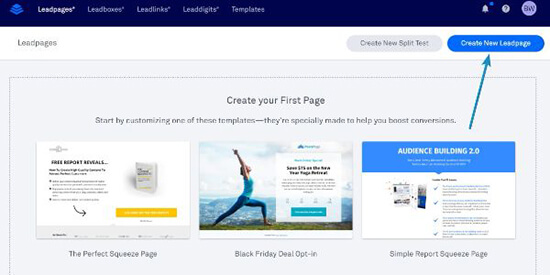
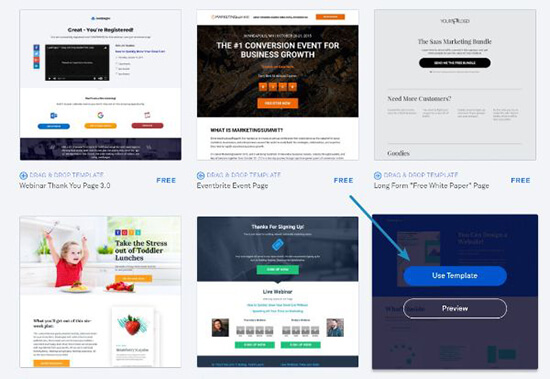
Then, Leadpages will ask you to choose from the 130+ free templates.
They also give you an option to switch to the old Standard editor (as opposed to the new Drag & Drop editor). While it’s nice to have the flexibility, the older experience is inferior to the redesigned editor, so I recommend that you always stick with the default Drag & Drop templates.
Of course, you can always start from a 100% blank canvas, as well. But because I think one of the major values of Leadpages is the template library, I’m going to demo modifying one of the free templates for this review:
Fun fact – this template is pretty similar to the template used on Blogging Wizard’s VIP Blogging Resources page. A page which is, uncoincidentally, built with Leadpages!
Once, you choose a template, Leadpages asks you to give the page an internal name and then throws you right into the drag and drop editor.
A deeper look at the Leadpages drag and drop builder
If you’ve ever used a WordPress page builder, you should feel right at home in the Leadpages editor.
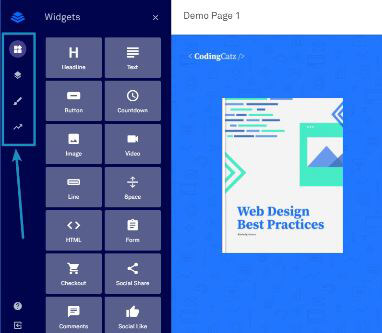
On the right side of the screen, you’ll see a live preview of what your page will look like. And on the left sidebar, you can access:
- Widgets – These are the building blocks of your page. For example, if you want to insert a new opt-in form or a button, you’d use a widget.
- Page Layout – This tab lets you build the foundational grid layout for your page using rows and columns
- Page Styles – This tab lets you choose fonts, background images, and more.
- Page Tracking – Lets you set up basic SEO settings (like meta title) as well as tracking and analytics code (like Facebook Pixel and Google Analytics)
For each widget that you use, you can also access settings unique to that widget.
So how easy is the Leadpages editor to use?
While it’s not 100% free-form like the Instapage builder, it’s pretty flexible. For example, to move an element, you just drag it to a new spot:

And you can similarly use drag and drop to resize column widths:

All in all, everything is pretty intuitive and, most importantly, code free. That is, you should be able to build good-looking and effective landing pages even if you’ve never looked at a line of code in your entire life.
Creating a call to action (CTA) with Leadpages
If you’re building landing pages, you’re probably planning to put at least one call to action (CTA) on the landing page, right?
At least I hope so! Smart use of a CTA button is an essential part of landing page optimization.
Because it’s so important, I want to give you a bit of a deeper look at Leadpages’ Button widget.
When you click on any button widget, it will bring up a new set of options:
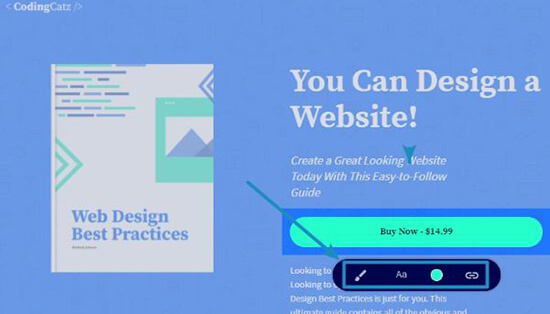
The two middle options are fairly simple. They let you set the:
- Font and font size
- Button and text colors
- But the outermost options unlock some interesting options.
First, by clicking the button on the left, you unlock the ability to quickly switch between different design styles:
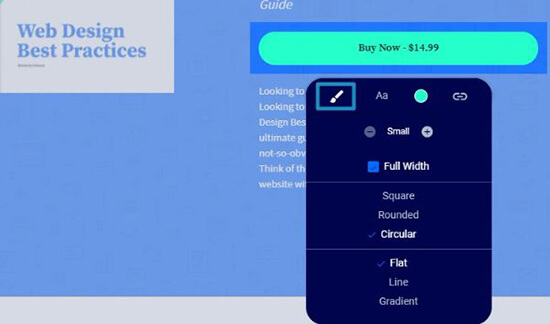
While not a huge deal, this makes it easier to create stylish buttons without needing to know a ton about design. For example, some other landing pages would require you to manually set the radius and shadows to achieve these effects, but Leadpages lets you do it just by selecting a preset option.
This is a feature that I love in Thrive Architect, so it’s great to see it make an appearance in Leadpages as well.
Second, the hyperlink button doesn’t just let you choose a URL to send the button to – it also allows you to easily link to another Leadpage or a Leadbox that you’ve created:
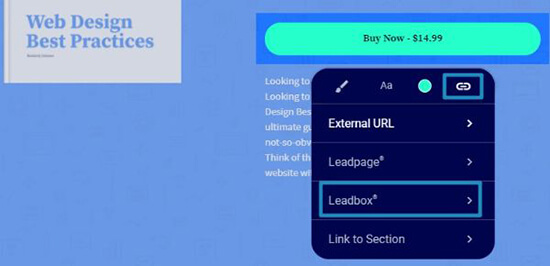
This is super helpful because you can use it to easily create two-step opt-ins, which are an effective way to increase your conversion rate.
With a two-step opt-in, your visitors click on the button to open a new pop-up with the signup details, rather than you just displaying those details on the page from the beginning (you can see this in action by clicking the CTA on the aforementioned VIP Blogging Resources page).
Leadpages makes the technique easy. And it’s also flexible because you can custom design each and every one of your popups using the same drag and drop editor (more on these later on in the review).
A look at how flexible the forms widget is
Another thing that you’re probably going to want to do on your landing pages is to display some type of form, right?
With the Leadpages Form widget, you get detailed control over all of the forms on your landing pages.
When you click on a Form widget, it opens up a new sidebar area where you can customize every aspect of your form:
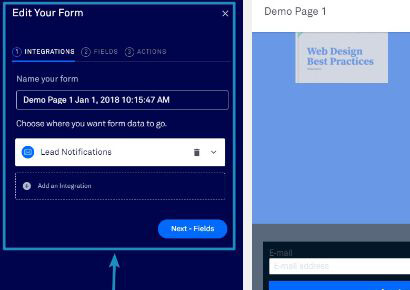
In this sidebar interface, you can:
- Integrate with email marketing or webinar services
- Add new form fields
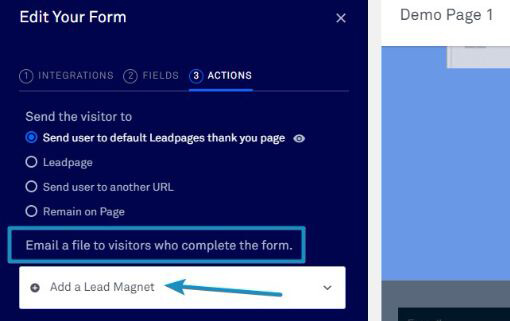
- Choose what to do after a user clicks submit
That last option is especially cool because you have the option to either:
- Keep the user on the page
- Send them to another page (like a thank you page)
- Email them a file, which makes it easy to create lead magnets
Working with payments and the checkout widget
The last individual widget that I want to look at is the Checkout widget. This is a fairly recent addition that lets you accept payments via Stripe and deliver digital products:

Basically, this widget lets you use your Leadpages and Leadboxes to sell things like:
- eBooks or other digital products
- Tickets to an event (like a private webinar)
And Leadpages even has plans to integrate upsells and downsells, though those features are still on the roadmap.
Responsive previews, but not a responsive drag and drop editor
You probably know about the importance of mobile traffic, which is why you should want to make sure that your landing pages look just as good on mobile devices as they do on desktops.
To help you ascertain that, Leadpages gives you an easily accessible responsive preview in the top right of the editor:
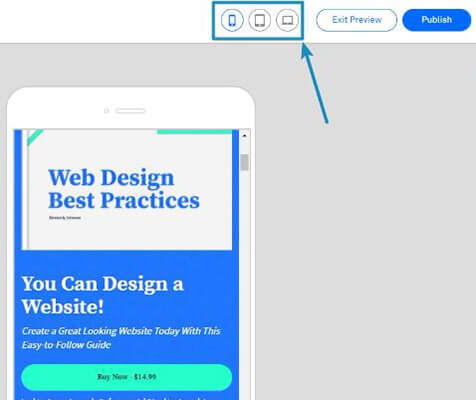
This brings me to one small criticism, though. This is only a preview. You can’t actually design your page according to the responsive settings, which is something that Instapage lets you do.
While Leadpages is pretty good at making your designs responsive, some extra control here would be nice.
Publishing your landing page, either standalone or on WordPress
Once you finish designing your landing page, all you need to do is click the Publish button to make it live on a Leadpages subdomain:
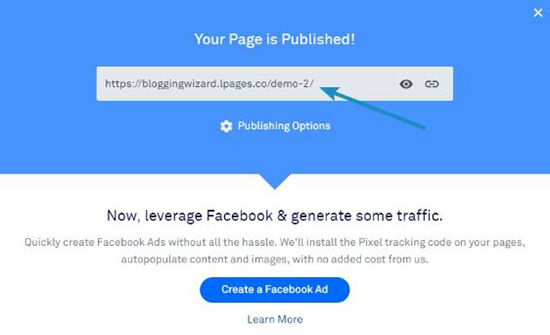
But leaving it on a subdomain isn’t the most professional look, so you’ll probably want to actually integrate it into your site so that you can use your own domain name.
Leadpages gives you a ton of different options to do that, including a dynamic HTML option that should work for most sites.
But here’s what I really like:
There’s a dedicated WordPress plugin.
With this plugin, all you need to do is log in to your Leadpages account from your WordPress dashboard and then you can quickly import Leadpages content as needed:
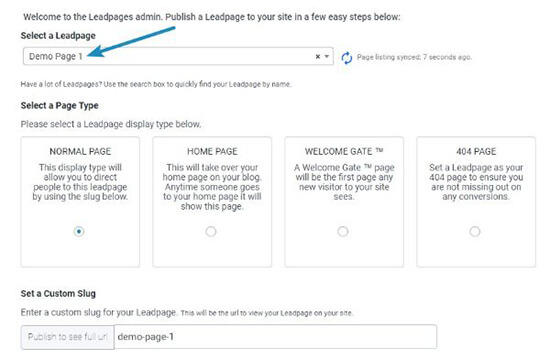
What are especially nice here are the extra features that let you:
Use your Leadpage as a welcome gate (the first page any visitor will see)
Cache your Leadpages to offer improved performance and page load times (this doesn’t work if you’re running split tests, though)
Speaking of split testing…
Creating A/B tests to optimize your pages
Leadpages makes it easy to spin up new split tests right from your dashboard:
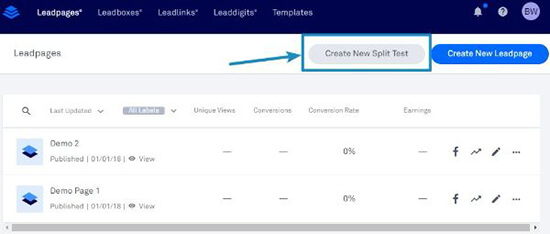
Once you click that button, you’ll be able to choose your control page and then add different testing variations as needed.
You can either create a variation by copying the control page and making a few tweaks or choosing a completely different page:
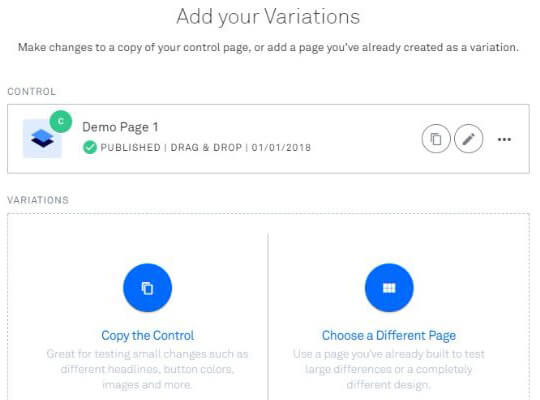
And you can also choose traffic distributions to control how much traffic goes to each variant, which is a nice bonus feature.
Viewing analytics to see how your pages are doing
Finally, while you can always integrate Leadpages with third-party analytics tools, Leadpages also includes an analytics tab that gives you a quick look at the traffic and conversion rate for all of your landing pages:
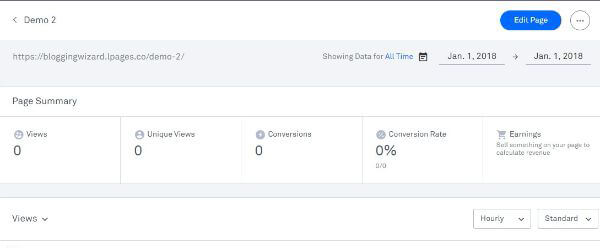
While you’ll still probably want to use a more detailed analytics service, these are helpful for getting a quick look at the health of your landing pages.
Build your entire website with Leadpages (2019 update)
When I first wrote this Leadpages review, you could only use the drag-and-drop Leadpages builder to design landing pages. That’s the functionality that you saw above.
However, in early 2019, Leadpages launched a new product that lets you apply the same style of builder to design your entire website. Yes – much like Squarespace and Wix – you can design entire standalone sites using Leadpages.
I won’t go quite as deep here because the actual building experience is quite similar to what you saw above with landing pages. Only now, you’ll get new options to control sitewide settings, like your navigation menus:

As with landing pages, you can start by choosing from a variety of premade website templates. Then, all you need to do is customize them to meet your needs:

And the best part is that you’ll still be able to insert all the other conversion-boosting Leadpages features. Speaking of…
How to create a Leadbox with Leadpages
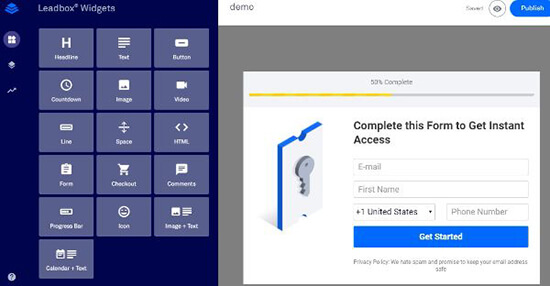
As I’ve already mentioned a couple of times, Leadboxes are popups that you can either trigger automatically or based on a specific action (like a visitor clicking a button).
To create a Leadbox, you can use the same familiar drag and drop editor from above, though the widgets and options have a few differences:
When you publish the Leadbox, you’ll be able to choose how it’s triggered.
You can trigger it by a:
- Plain text link
- Button link
- Image link
- Timed popup
- Exit intent popup
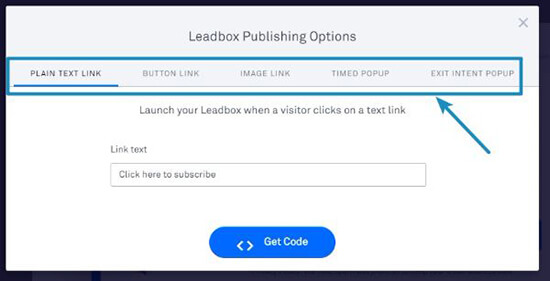
What’s nice is that through these options, you can easily integrate a Leadbox in content that isn’t a Leadpages landing page.
For example, you can use the plain text link to include a two-step opt-in in a regular WordPress post or page, which gives you a good deal of flexibility.
How to create Alert Bars with Leadpages
In addition to rolling out the full website builder in early 2019, Leadpages also released another new tool to help you boost your conversion rates:
Alert Bars. Or, you may also know these as notification bars.
You can now create eye-catching, responsive bars that you can use to:
- Promote offers
- Drive signups (e.g. to a webinar)
- Grow your email list
To get started, you can choose from one of the premade layouts and customize the text:
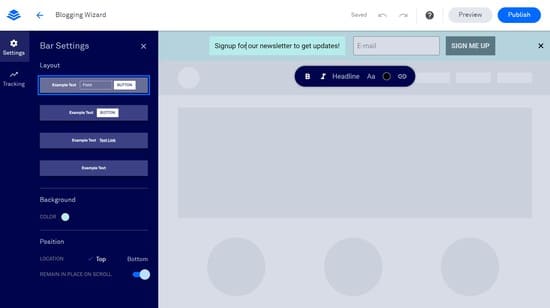
Then, you can publish your alert bar on both landing pages/sites that you’ve built with Leadpages, as well as standalone sites built with another tool (like WordPress).
You’ll be able to connect your alert bar to all the normal Leadpages integrations. And you’ll also get access to the same great analytics to track your bar’s success.
The only thing I’d like to see added is the ability to A/B test your alert bars, as you don’t seem to have that option right now. This feature is new, though, so hopefully A/B testing comes in the future!
Leadlinks and Leaddigits: Two smaller, but helpful features
Finally, I want to round out the hands-on section of my Leadpages review with a look at two smaller features:
- Leadlinks
- Leaddigits
You probably won’t rely on these as much – but they let you do some pretty neat things.
With Leadlinks, you can create a link that automatically signs subscribers up to a sublist or webinar with just a click.
This is handy for, say, sending an email blast to your subscribers about an upcoming webinar. Rather than requiring subscribers to enter their information again, you can just sign them up as soon as they click the link.
Less friction means higher conversions!
Leaddigits lets you do something similar but with text messages. You can let your customers opt-in by mobile phone and then automatically add them to a specific email list or webinar:
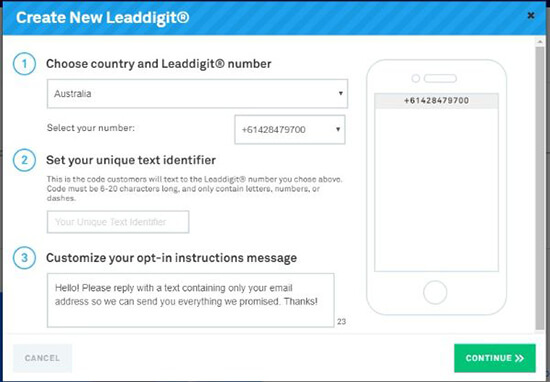
This is probably the most niche feature – but if it fits with your audience, the functionality itself is pretty cool.
How much does Leadpages cost?
Leadpages starts at $25 per month, billed annually. But…
The cheapest plan does not include:
- A/B testing
- Leadboxes
- The payment widget
- Leaddigits or Leadlinks
If you want those features, or some other more advanced features, you’ll be looking at one of the pricier plans which start $48/month (billed annually).
Note: their pricing & features do change from time-to-time so it’s worth checking their pricing page for the latest.
Leadpages pro’s and con’s
Pro’s
- Beginner-friendly drag and drop editor
- 200+ free templates, plus even more paid templates
- Easy to create A/B tests
- Built-in analytics
- Easy two-step opt-ins
- Good selection of widgets
- Lead magnet functionality for asset delivery
- Tons of integrations for email marketing services, as well as webinar services and more
- Helpful added functionality in Leadboxes, Leadlinks, and Leaddigits
- NEW: Build entire conversion optimized websites in a few clicks (no need for a website builder like Wix)
- NEW: Alert bars allow you to add “notification” style forms and CTA’s on your site
Con’s
- While there is a responsive preview, you can’t actually design the responsive version of your page
- The price puts Leadpages out of range for most casual users.
- Not all features are included in the cheapest tier, which makes the cost even pricier if you want to do things like A/B test pages.
Should you use Leadpages to build your landing pages?
Functionality wise, I think Leadpages is great. It’s definitely a more powerful experience than a WordPress page builder.
The only confounding factor is its price, which is pretty hefty in comparison to a WordPress page builder solution.
If you want a super easy way to create gorgeous landing pages across multiple sites, as well as advanced features like Leadboxes, tons of integrations, and A/B testing, Leadpages won’t let you down.
You just need to make sure that those features are generating a good ROI for you, either in terms of increased revenue or time saved.
You don’t have to guess, though – Leadpages offers a 14-day free trial, so you can sign up and see if the extra features are worth the added cost.
0 Comments